 Buy Now →
 Breakfast Quiche
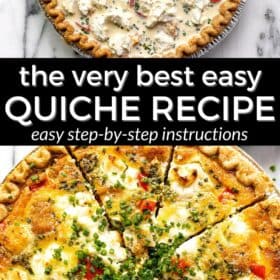
This breakfast quiche recipe is the easiest fancy feeling brunch dish ever! It’s made with simple ingredients, and I’ll break down each step so you feel confident cooking this delicious quiche perfectly every single time!
- Prep Time: 10 minutes
- Cook Time: 1 hour 20 minutes
- Total Time: 1 hour 30 minutes
- Yield: 8-10 servings
- Category: Breakfast
- Method: Oven
- Cuisine: French
Ingredients
Units
Scale
- 1 (9-inch) frozen deep dish pie crust
- 3 eggs
- 12 oz. heavy cream
- 1/2 teaspoon garlic powder
- 6 strips bacon, cooked crispy and crumbled
- about 1 cup of cooked tater tots (15-16 tater tots)
- 1/3 cup diced red bell pepper
- 4 oz. Lifeway Farmer Cheese (or goat cheese)
- 1/2 cup shredded sharp cheddar cheese
- 1-2 tablespoons thinly sliced chives + more for garnish
- Kosher salt
- fresh cracked pepper
Instructions
- Heat oven to 375 degrees.
- Line crust with parchment paper and place dried beans inside. Blind bake crust for about 20 minutes, then carefully remove the parchment paper and beans and bake for another 15 minutes or until the crust is golden brown. Allow to cool for 5 minutes.
- In a large bowl, whisk together eggs, heavy cream, garlic powder, and a couple pinches of salt and pepper until super smooth and well combined.
- Add cheese, bacon, tater tots, red pepper, chives, and Lifeway Farmer Cheese to the partially baked pie crust.
- Pour egg mixture over the filling.
- Bake for 30 minutes. Then add a tin foil ring that just covers the crust and bake for another 15-25 minutes.
- After adding the foil ring, check the quiche every 10 minutes or so, inserting a thin knife into the center of it, until the eggs are set and the knife comes out clean.
- Let sit for 10 minutes, garnish with chives, slice, and enjoy!
Notes
- Don’t skip the blind bake! I know blind baking can seem daunting if you’re not a baker, but I promise it’s super easy! Dried beans and parchment paper are all you need for blind baking and they can be found at your local grocery store. The blind bake is going to ensure that the quiche comes out perfectly flakey and delicious. Since the custard-like filling is quite wet, it’s important to make sure that the crust of the quiche is crisp enough to stand up to it.
- Cover crust with a tin foil ring. Because you’ve baked the crust before adding the filling, the crust is going to get brown on the edges before the eggs are set and the quiche is cooked through. A simple tin foil ring to cover the crust will ensure that it doesn’t burn. After about 30 minutes in the oven, carefully add a tin foil ring and then continue baking for another 15 minutes or so.
- If you find that the entire quiche is getting too brown, feel free to cover the whole quiche with a sheet of tin foil instead of just a foil ring. To make my foil ring, I took one long piece of foil, cut it in half lengthwise, folded it into quarters lengthwise, and then folded them together at the ends. Then I just pleated the foil into a circle, carefully measuring it over my pie crust until it was just the right size. Store the tin foil ring in your cupboard or pantry so you can use it next time you make a quiche!
- You may not have room to add all the filling! I can sometimes get it all in there and other times I end up with a tablespoon or so leftover. This depends on the amount of filling that you have in the quiche.
- Fill the quiche with whatever you’d like! This recipe is super forgiving, but the amount of egg custard is measured to fit with all these ingredients, so if you’re subbing different ingredients, be sure to keep the ratios about the same.
- If you prefer fewer veggies/meats and a more eggy custard quiche or if you add everything and the custard doesn’t cover the ingredients, you can just add more eggs and cream! The ratio is 1 egg for every 1/2 cup of heavy cream. So if you’d like more custard filling, try combing 1 egg + 1/2 a cup of heavy cream along with a couple pinches of salt and pepper and pour that over the quiche.
- Pay close attention to the baking times listed on the recipe card. This recipe is a bit more wordy and complex than those I usually make, but it’s worth the extra fuss, I promise! Just be sure to read each step carefully and bake for the recommended time, keeping in mind that all ovens bake differently so you’ll have to use your judgment as well.
- If you prefer to use homemade pie dough, check the dough recipe for blind baking instructions as they may be a bit different. You can also use a large skillet if you don’t have a pie pan or pie dish.
Nutrition
- Serving Size:
- Calories: 338
- Sugar: 1.9 g
- Sodium: 532.3 mg
- Fat: 29.1 g
- Saturated Fat: 14.4 g
- Carbohydrates: 7.6 g
- Fiber: 0.9 g
- Protein: 11.3 g
- Cholesterol: 120 mg
Find it online: https://midwestfoodieblog.com/breakfast-quiche/


